
Like a reverse cymbal sample, a reverse snare can be used to build anticipation and energy to tease the next part of a song. In particular I like to use a reverse snare to fade into an actual snare hit. This creates a little break to flow into a final chorus after a bridge. And just like making a reverse cymbal sample, you can easily create a reverse snare in your DAW. Here’s how.
How to Make a Reverse Snare
Step 1 – Get a Snare Sound (Organic or Digital)
First, you’ll need an isolated snare hit. I’m assuming you already have a snare sound in your mix, but if you don’t or you don’t have an isolated one, your DAW almost certainly has a midi drum kit.
Simply load snare sample, drop it on your timeline, then solo and bounce it to raw audio.
In many DAWs like Ableton Live, you can freeze the track then “flatten” it so that you don’t have to bounce anything. This converts midi to raw audio without having to bounce and import a file.
If you do bounce your snare to pull back into your DAW as raw audio, make sure you get the full snare sound including the complete decay as this is what we’ll want to reverse in a moment.
Step 2 – Add Sustain With Compression or Reverb
This is optional, but typically the decay you’ll get with a normal snare hit won’t be enough to create the amount of fade in that we want when it’s reversed.
You can add sustain to that decay by dropping a compressor on the track, which is the secret sauce for getting a good reverse snare.
Replicate the settings/general guidelines I’ve outlined below using FabFilter’s Pro-C compressor to create the sustain you’ll want.
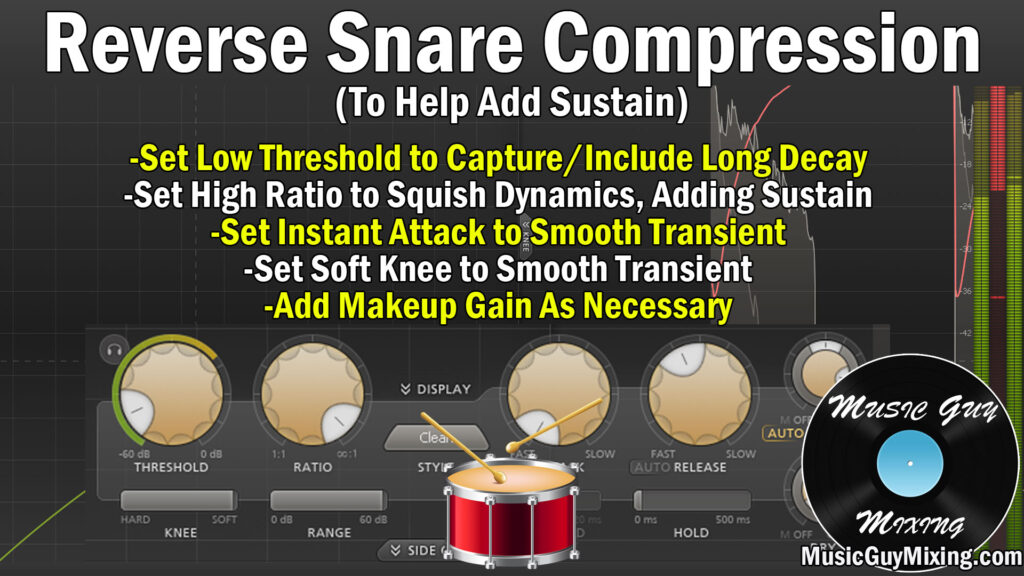
Essentially this means:
Low Threshold – Setting the threshold to catch everything above ambient room noise will capture the entirety of the decay. We want as much of the decay included as possible, and setting a low threshold accomplishes this.
High Ratio – A high ratio flattens the transient and essentially reduces everything to the same volume output. This is where we get our sustain.
Instant Attack – We don’t want transients most of the time with a reverse snare because we’re feeding into a normal snare. The normal snare has the transients of the stick on skin that we want (see my snare EQ guide); with the reverse snare we just want a nice smooth run up. Note that the release isn’t really a factor because we’re capturing so much of the sustain through the threshold and ratio settings.
Soft Knee – A soft knee also helps to smooth out the complete tone which I find works well for a reverse snare.
Makeup Gain – Lastly, know that these settings are going to seriously turn down the output gain of the snare. As such, use auto makeup gain or increase the makeup gain manually to match the input gain.
If you need more sustain after this, you can add a reverb or even a second compressor, but I recommend trying the next steps first to see how it sounds reversed and in the context of the mix.
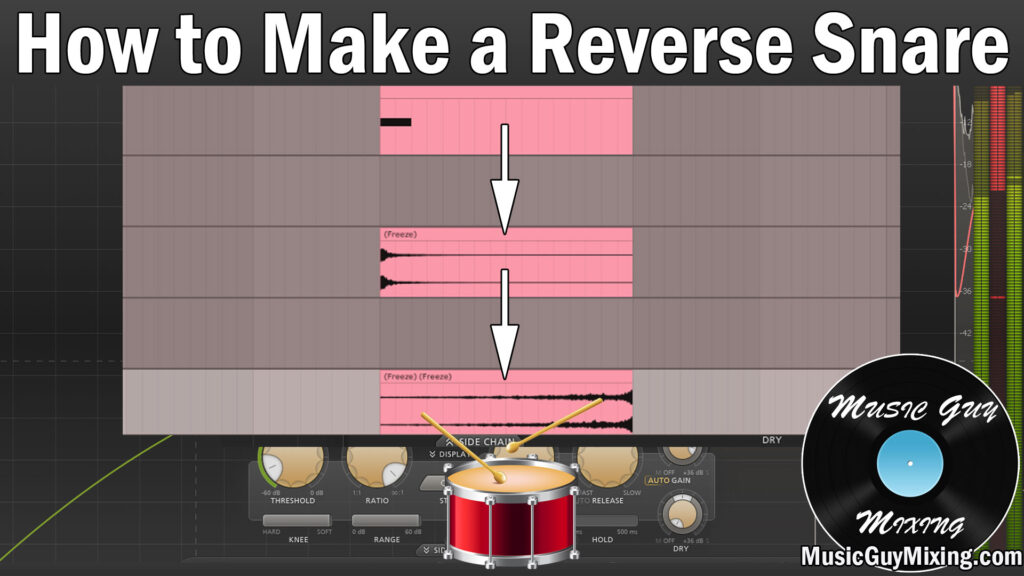
Step 3 – Bounce and Reverse the Snare
Next we want to bounce and reverse the snare. Once again we can freeze and flatten this track or just bounce it to bake that extreme compression into the new raw audio.
The process for reversing the track will vary from DAW to DAW. In Live we simply highlight the track and type “R” to reverse it.
You can see the effects of the compression in the final track in the below image. I’ve reversed the track and you can see all of that sustain on the tail which now works as a lengthened fade in for the snare.
Step 4 – Adjust and Cut End
Now we just need to adjust the track where we want a reverse snare fade in. I would move it to the left so I get a nice 2 bar fade in to the actual snare. This emphasizes that snare hit and like I mentioned in opening is great when we’re teasing and setting up a chorus.
Note that you may want to cut the end off which is essentially the transient of the snare hit.
In step 2, we worked hard with the fast attack in particular to remove the transient to focus on the decay. If that transient hasn’t been smoothed out enough, cutting off a beat at the end to ensure we are just left with decay to fade up into the transient of the real snare works well.
If after all this you need more of a fade in, meaning the decay isn’t long enough, repeat step 2 to add more sustain or even add a clean sounding reverb (check out my Ableton reverse reverb trick, while you’re at it) to add some extra tail to that snare for some extra sustain.