
Unless you’re going for some very specific aesthetic, like a claustrophobic mono reverb heavy vibe, you want your drums to sound full and wide. This drum panning guide will explain exactly where to pan each drum to achieve that professional, open sound.
Drum Panning
Let’s go piece by piece in the kit to explain the best drum panning locations for each drum. Just as importantly, I’ll also explain WHY we’re panning each drum where I recommend.
Drum Panning Chart
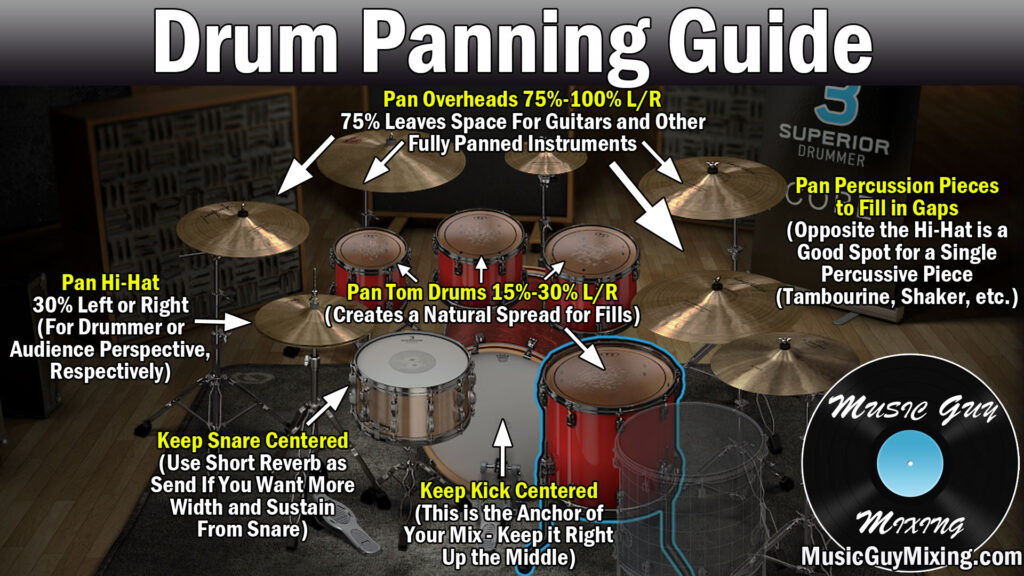
This drum panning chart gives a nice overview as to where each piece should go. This graphic (from my go-to virtual drum kit of choice, Superior Drummer 3) represents most of the pieces you’ll have in your mix.
Kick Panning
To kick off this drum panning guide, we’ll begin with the kick (pun intended).
If you don’t have a clearly defined kick, your mix will lack focus and purpose (not to mention listeners, as well).
This is why, unless you’re doing something very specific, most of the time you’ll want to pan this right up the middle. There are a few exceptions if you’re going for a certain aesthetic or mixing in more fringe genres, but virtually all of the most popular genres it’s commonplace to pan up the middle.
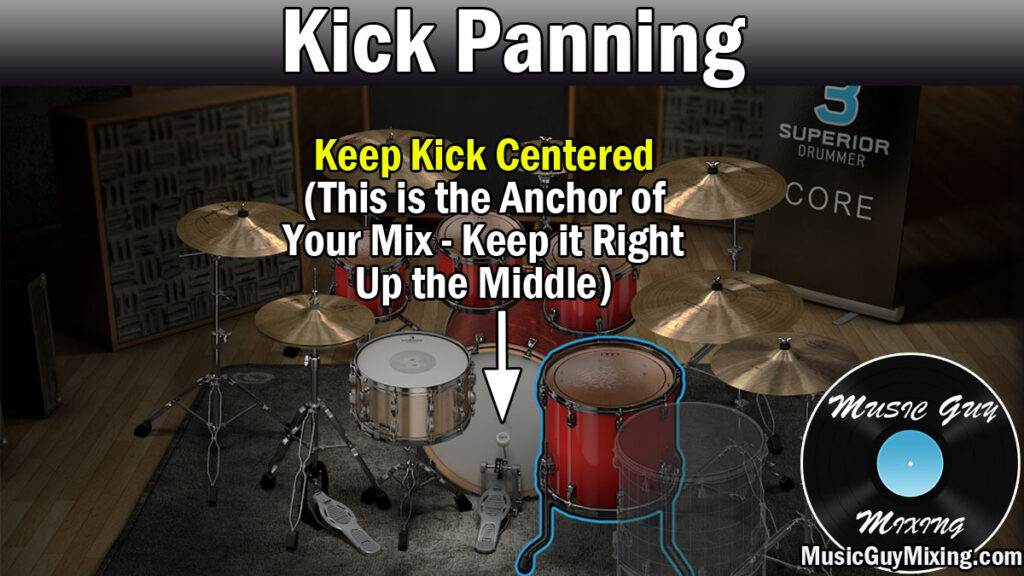
If you want a bit more width out of your kick, you can drop a short reverb or delay on an auxiliary track, then set the width and mix in to taste.
This can be useful in sparser mixes where you have more room to work with.
I recommend using a utility plugin on this aux in this case which monos frequencies below 150hz so that the bass/heart of the kick remains in the middle.
By the way, part of having a clearly defined kick is EQing it properly so see my guide on how to EQ a kick drum.
Better yet, just grab my free EQ cheat sheet which explains how to EQ every single instrument in your mix like the pros.
Snare Panning
Similar to the kick, you generally want your snare right down the middle, as well.
The only issue with panning two instruments on top of each other is if there’s a frequency conflict.
The fundamental of the snare is well above the kick, so the two work together straight down the middle to be that anchor for the rhythm and overall vibe of your mix.

While the snare itself is panned down the center, many mixing engineers like to add reverb to their snare to give it some depth, width, and more sustain out of the tone.
Simply drop a reverb with a relatively short decay time (somewhere in the 500ms area) on an auxiliary track and mix it in. Adjust the width of that reverb in the context of the mix if it begins stepping on panned (left or right) tracks.
Remember the Abbey Road Reverb Trick works well in this case for keeping that reverb clean and ensuring it doesn’t muddy up your mix (see more tips for removing mud from a mix).
Make sure you know how to use snare EQ effectively to keep it clean, cracking, and prominent.
Hi-Hat Panning
This is where we can start to pan the actual instruments left and right. Not only does this create a more interesting stereo image, but it frees up space in the middle for the kick and snare.
With the hi-hat, you have a choice in whether you want to pan it from the drummer’s perspective (left) or the audience’s perspective (right). Note that this orientation assumes a right handed drummer which means the hi-hat is set up on their left.
With the hi-hat, I like to pan it about 30% right, simulating where you would hear it in the audience in a live setting. That said, sometimes I’ll move it to the other side if I’ve got too much going on in the right channel. The main takeaway is that 30% off center works well.

Note that different DAWs treat panning units differently. Some use percentages, others use numbers which don’t necessarily go to 100 on either side. In my DAW, Ableton Live, “50” represents an extreme pan on either side with 0 being center. So when I say 30%, in Live’s case I would put it at around 15R.
Similar to the width of the reverb earlier, you can add width in this way or simply use a stereo imaging plugin to make it wider depending on how busy the mix is.
If you’ve got a lot of instruments, vocals, and tracks in general fighting for space, you might want to go with a more narrow hi-hat.
Note that if you’re doing LCR mixing, meaning every single track occupies either the extreme left, right, or center positions, you can experiment between a side and center position. If neither sounds right, you can make the hi-hat the one exception (thus proving the rule?) and keep it just off center in your LCR mix.
Tom Panning
Panning the tom drums is interesting because they’re typically miced up separately, so you might have as many as three or four individual tracks for your tom panning.
I like to use tom panning as a natural way to create more dynamics in the stereo field’s width. Just like with the hi-hat, I think about the various tom drums’ perspective in relation to the audience.
The floor tom (the big one which sits on the ground) is typically opposite the hi-hat, so I’ll go about 30% left for it.
That leaves the rack toms (the mounted medium sized ones which connect to the kit) as a 15% left and right. When a part is played utilizing all of the toms in succession, you get a nice, natural spread.

Once again, you can pan these out wider if you’ve got the room.
Overhead Panning
The overhead microphones are there to pick up the cymbals and give you another taste of the previously mentioned pieces of the kit.
Typically you’ll want to pan these decently wide, though this depends on the other instruments in the mix and what else you’ve panned wide.
For instance, if you’ve got guitars panned hard left and right, meaning 100%, you may or may not want to put the overheads right on top of those. You might want to just go 75% with either the overheads or the guitars so that they’re not right on top of each other in the mix.
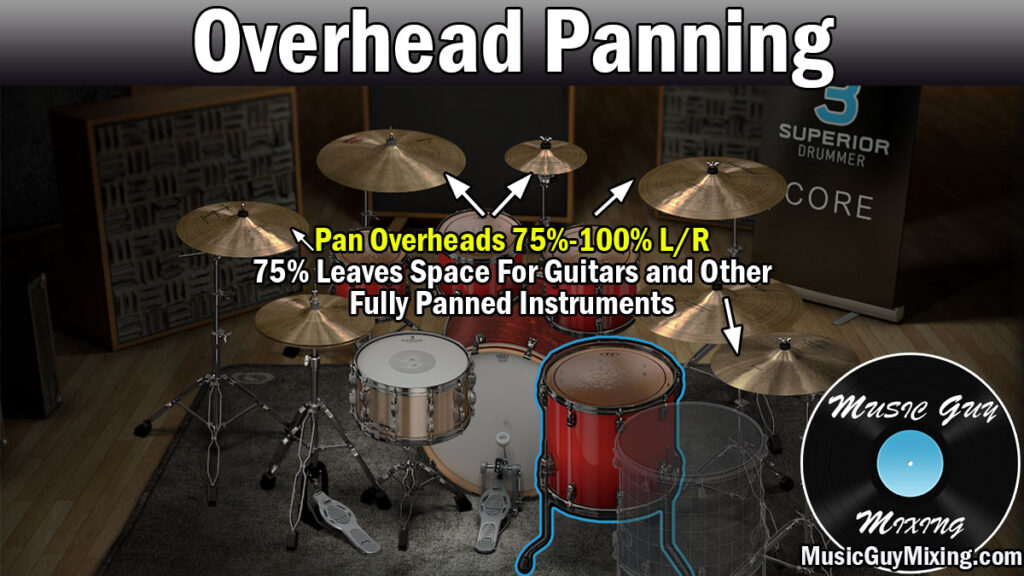
There’s no rule against this, of course. Once again, LCR panning (left, center, right) involves panning every instrument either hard left, right, or center.
In my experience, this works for sparser mixes which don’t involve as many tracks.
Percussion Panning
Lastly, if you’ve got any additional percussion (shakers, conga drums, tambourines, etc.), then you can fill in the gaps with any space you have leftover.
Adding these pieces makes for a little ear candy and creates a fuller stereo image in the context of drum panning.
The most common percussive piece I have in my mixes is a tambourine. I find that panning this at 30% on whichever side the hi-hat is NOT on balances that hi-hat well. They both have similar frequency ranges so panning it opposite to the hi-hat creates a nice balance. You can do the same thing with a shaker if you only have one or the other.

Otherwise, once again just aim to fill in any gaps with your percussion.
Drum Panning Tips
- Making use of most of the stereo field when it comes to drum panning helps your kit sound full and open like professional mixes.
- Begin by keeping your kick and snare centered in the stereo field.
- If you want a bit more size or sustain, particularly on your snare, try blending in a short reverb via a send.
- Pan your hi-hat 30% left or right, depending if you want the drummer or audience perspective (respectively).
- Pan your tom drums 15%-30% left and right. This creates a nice natural stereo spread on fills in particular.
- Pan your overhead microphones either 75% or 100% left and right. I generally go for 75% myself to leave the extreme left and right positions for my guitars or other wide panned instruments.
- Pan any remaining percussive pieces to fill in gaps in your mix. I like to pan a tambourine or shaker to the opposite spot of my hi-hat as a nice balance on either side at that position.